Full Length Sizing for Bottleneck Cases
This article describes the process of resizing bottleneck cartridge cases. Setting up the sizing die for a bottleneck case requires a higher level of precision than for straight-walled cases, and the quality of your setup has a much bigger impact on safety, accuracy, and brass life.
Full Length Sizing
This article will describe the process known as "full length" resizing. With full length resizing,
the entire case is returned to its original 'factory' dimensions. During full length sizing, the
case body is squeezed back to its original dimension, the case shoulder is pushed back, and the neck is
reduced in diameter so that it will hold a bullet. Full length resizing allows the reloaded cartridge
to be fired in any firearm of the appropriate caliber. Another type of resizing called "neck sizing"
can be also be used, but neck-sized cartridges can only be used in the rifle that last fired them, and is
not appropriate for all firearm types. I'll cover neck sizing in a later article.
Case Lubricants
Unlike straight walled cases, it is necessary to lubricate bottleneck cases even when using a carbide sizing die.
If you try to resize an unlubricated bottleneck case, you will find that it requires a significant amount of force
to insert the case into the sizing die. Although difficult, it's not impossible to take advantage of the
leverage inherent in the design of your reloading press to muscle a dry case up into the sizing die.
The trouble starts when you try to get it out. Without lubricant, the case will be stuck so firmly
in the die that the shellholder will rip the rim off the case when you try to extract it. This quickly
puts an end to your reloading session while you hunt down a stuck case extraction kit to get your sizing
die back into service. You must lube bottleneck cases prior to sizing.
The most effective case lubes are lanolin based. For a small number of cases, a solid lanolin lube such as Imperial Sizing Die 'Wax' (on the right in Figure 1) is convenient. Simply rub the tips of your fingers over the lube, and then handle each case to apply a thin film of lubricant onto it. With a little practice, this can be accomplished while picking up the case and placing it into the shell holder.
For larger numbers of cases, a lanolin-based pump spray lube is more efficient (Figure 1 on the left). To use a spray lube, spread an old dishtowel out on your bench and place a hundred or so cases on it in a single layer. Spray the lube onto the cases, use your hands to roll the cases around to coat them, and then wait for the liquid carrier in the lube (isopropyl alcohol) to evaporate off. The cases will be coated with a thin film of lanolin, and ready to go into the sizing die. Put the now lanolin-soaked dishtowel in a ziplock bag for future use. The more saturated it gets, the less lube you'll have to spray.

Lanolin-based pump spray lubes are available from Dillon and Frankford Arsenal. You can also make your own using anhydrous lanolin (available from online suppliers) and 90% isopropyl alcohol (gas line anti-freeze) in a 1:10 ratio.
If you instead decide to use a non-evaporating liquid lube (such as with a lube pad), be careful not to leave any droplets of liquid on the case neck or shoulder because the liquid will create dents in the cases during sizing.
Headspace
Before we get into setting up the sizing die, we need to discuss headspace and cartridge headspace length.
Headspace in a firearm is defined as the distance from the breech or bolt face to the part of the chamber that
stops the forward movement of the cartridge when it is inserted into the chamber. For rimless bottleneck
rifle cartridges (like .223, 308, and .30-06), the part of the chamber that stops the forward movement of the
cartridge is the angled portion that contacts the shoulder of the case. The cartridge headspace length
is the distance from the case head to the part of the case on which the cartridge headspaces. For a
rimless bottleneck rifle cartridge, this is a point on the shoulder of the case.
The difference between the chamber's headspace and the cartridge headspace length determines the amount of extra fore-and-aft 'room' the cartridge has in the chamber. If there is too little room (because the cartridge headspace length is too long for the chamber), the bolt will not close and the firearm will not go into battery. Too much room (because the cartridge headspace length is too short for the chamber) can result in inconsistent ignition, poor accuracy, short brass life, or catastrophic case head separation. In other words, if you get the cartridge headspace length wrong, the ammo will not shoot at all, will shoot badly, or will blow up. Therefore, it's quite important to get the cartridge headspace length right.
Measuring Headspace Length
There are two common tools available - The RCBS Precision Mic and the Hornady Headspace Comparator - that allow you to
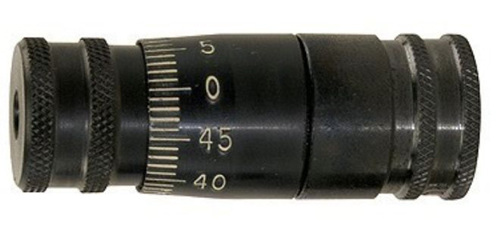
measure cartridge headspace length. The Precision Mic from RCBS (Figure 2) is a self contained device that is
sort of a specialized hollow micrometer. To use the Precision Mic, you unscrew the top, drop in a case, and
screw the top back on until it contacts the case shoulder. There are graduations on the side of the device
that allow you to read the headspace length of the case compared to the SAAMI "0" distance for that caliber.
The RCBS Precision Mic is caliber/cartridge specific. If you want to measure the headspace length of the .308
and .30-06, you'll need two different Precision Mics - one for each caliber. RCBS makes Precision Mics for
dozens of common calibers. They cost $40 to $50 each.
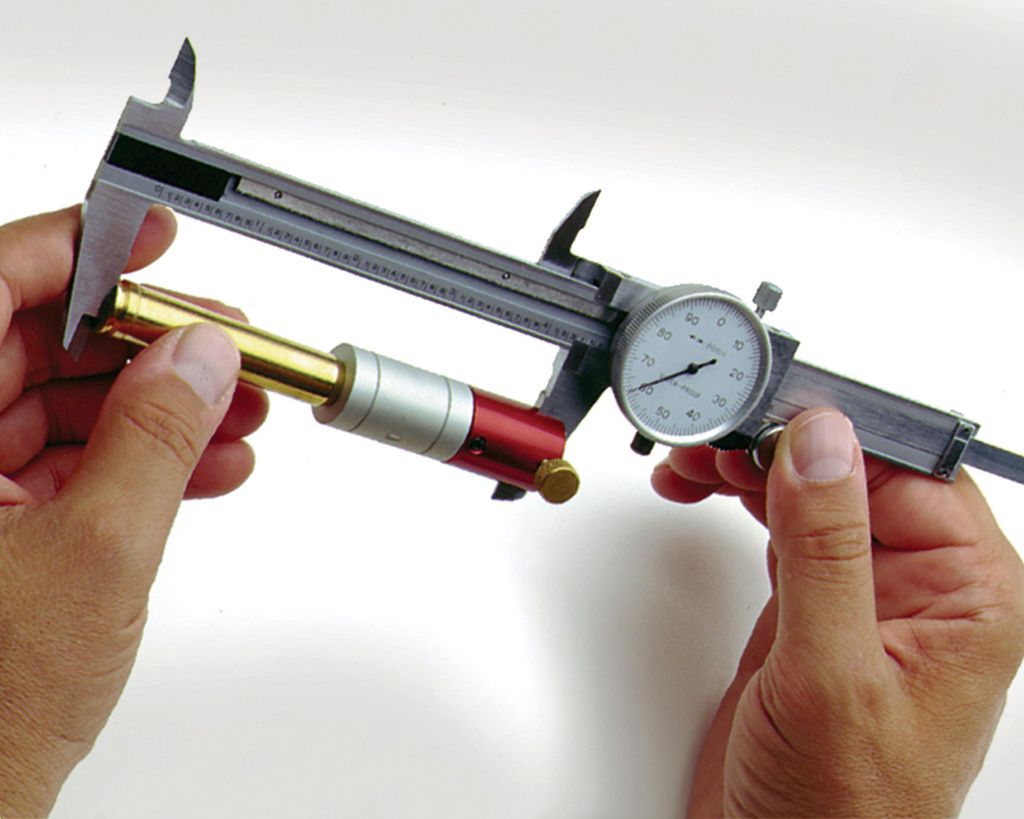
The Hornady Headspace Comparator Set is used in conjunction with a dial or digital caliper. To measure headspace length with the Hornady Comparator, you attach the bushing holder to one jaw of the dial caliper, then install the caliber-appropriate bushing into the holder. The bushing has a hole with a diameter that is larger than the case neck, but smaller than the case body. You place the neck of the case to be measured into the hole on the bushing, and close the caliper until it contacts the case head. The resulting measurement will show you the distance from the case head to a point on the shoulder of the case. (See Figure 3).
The Hornady kit costs about $40. It comes with 5 bushings that allow you to measure the headspace length on 100's of different cartridges. Instead of measuring to SAAMI "0", the Hornady gage gives you a relative measurement of the case headspace length. As you'll read below, a relative measurement is often enough.
Setting up the die
The goal in setting up the full length sizing die is to set the die so that it pushes the case shoulder back far
enough so that the cartridge will reliably chamber, but no farther. The height of the die in the press will
determine the distance that the shoulder is pushed back. For semi-auto, lever action, and slide (pump)
action rifles, you'll want the cartridge headspace length to be 0.003" to 0.006" shorter than the chamber.
You can make it a bit tighter for bolt action and single-shot rifles, with the cartridge headspace distance only
0.001" to 0.003" shorter than the available room in the chamber.
We've already discussed how to measure the headspace distance on the case, but how do you measure the available room in the chamber? It's simple - measure the headspace length of a case that was fired from the rifle. When a bottleneck cartridge is fired, it fire-forms (expands) to take up all of the available space in the chamber. The sides and neck expand, the shoulder blows out and the case stretches to take up all of the available headspace. Simply measure a fired case using the tools (either the Precision Mic or the Hornady Headspace Comparator) described above. Before setting up the sizing die, measure and record the headspace distance of a case fired from your rifle. Subtract the appropriate amount (0.003" to 0.006" for a semi-auto, lever or pump action, 0.001" to 0.003" for a bolt action of single shot) to determine the "target" measurement for your sized case headspace length.
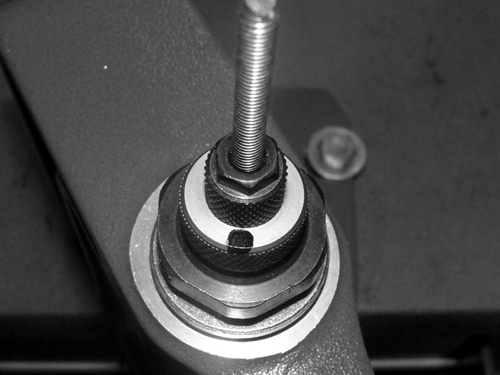
To initially set up the die, follow the instructions that came with the die. Typically, they'll instruct you to install the shell holder, and then screw the die into the press so that the shell holder cams against the bottom of the die when the ram is raised all the way up. Do not lock down the die when you do this. Using a permanent marker, draw a witness mark on the die at about 6:00 (see figure 4). This will act as a reference mark to allow you to arrive at your final settings more efficiently.
Take a clean, lubed, fired case from your rifle, place it in the shell holder, run it through the sizing die, and measure the headspace length. It will almost certainly be shorter than your target measurement.
You'll need to back out the die slightly to increase the headspace length of your sized cases to match your target distance. This is where your witness mark comes in handy. Standard reloading dies have 14 threads per inch; so one complete turn of the die will move it vertically 1/14th of in inch (about 0.071"). Picture the circular die as the face of a clock, and your witness mark at 6:00 as the hour hand. If you were to move the witness mark from 6:00 to 5:00, you would back out the die about 0.006". Studies have shown that most people can discern the time to within 15 minutes just by looking at the hour hand. If you can do this, you'll have the ability to adjust your die height (and case headspace length) in 0.0015" increments using your witness mark.
Adjust the height of the die, run another clean, lubed, fired case into though the die, and measure it. Continue to adjust the die until you reach your target case headspace length measurement. Tighten the locking ring on the die (without moving the witness mark) and run one more case though it to verify that you have it set properly. With the die locked in place, your cartridge headspace distance is set. It shouldn't move during use, but if it makes you feel better, you can re-measure every so often to ensure that you're still on the money.
PLEASE NOTE: The above procedure assumes that you are using cases that were last fired out of the rifle for which you are loading. If you are setting up the die using mixed brass or range pickups, first measure the headspace length of the fired unsized cases that you will use for setup to ensure that they start out longer than your target case headspace length. If the cases were fired from a rifle with a chamber shorter than your rifle, backing out the die will not increase the case headspace length of an already too-short case.
In some rare cases when using a single-stage press, the headspace length of the sized case will still be too long even when the die is bottoming out hard on the shell holder. While the part of the shell holder that attaches to the ram is standardized (so that it will fit in any standard press), the height of the shell holders is not standardized. Some are taller than others. This problem can be avoided by using a shell holder from the same company that manufactured your dies. If you're stuck with a mismatched set, you can reduce the height of your shell holder by placing a sheet of 400-grit silicon carbide wet/dry paper onto a flat surface (such as a piece of glass) and lapping the top of the shell holder in a figure-8 pattern.
The Expander Ball
When extracting the sized case from the die, you will feel resistance as the case initially frees itself from
the die. As you further raise the handle to lower the ram, you will feel almost no resistance for the
next inch or two of ram travel, followed by a noticeable period of additional resistance just as the case is
fully extracted from the die. This final bit of resistance is caused by the expander ball being pulled
through the case neck. The expander ball is necessary to ensure that your case necks all have a consistent
inside diameter regardless of the thickness of the case.
Cases from different manufacturers will vary slightly in case wall thickness. To ensure that the neck of every case processed by your sizing die has the same inside diameter, the reloading manufacturers design the dies so that the portion of the sizing die that reduces the diameter of the case purposely makes the neck undersized. When the case is extracted from the die, a part of the decapping mandrel called the expander ball is drawn though the neck to increase the diameter from the inside. This ensures that the inside diameter of the necks of your resized cases will be the same regardless of the thickness of the case walls.
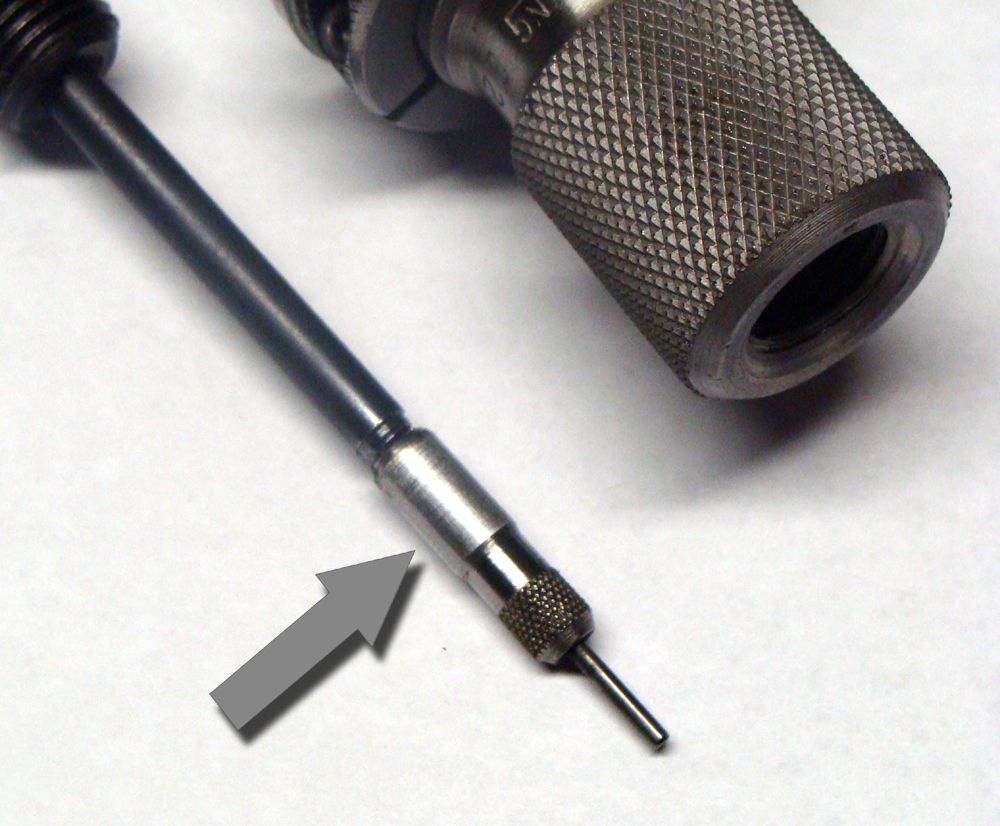
In many dies, the expander ball also acts as the nut that holds the decapping pin to the mandrel (see figure 5). You should never resize cases with the expander ball removed. Some reloaders that decap the cases prior to sizing will run them through the resizing die with the entire decapping mandrel removed. This is a mistake. The resulting cases will have necks with varying inside diameters, all of which will be too small.
In addition, you should replace the entire decapping mandrel/expander ball assembly if you ever have a malfunction that results in a bent decapping mandrel. If you try to straighten it yourself, and do not do it perfectly, the last thing that will be dragged through the case neck prior to seating the bullet will be a bent mandrel. This can only hurt your accuracy.
Why It Is Important To Set Up Your Dies This Way
If you were to leave the sizing die set up per the instructions that came with the die, you would likely push the shoulder
back farther than necessary for your rifle. The resulting round will load up OK, chamber, and fire (probably safely)
in your rifle. So why bother adjusting the sizing die to create a case that's a better fit for your chamber? The
reason is that properly sizing the case for your chamber results in better accuracy, less case stretch when the round is
fired, and longer brass life.
You achieve better accuracy though more consistent ignition. When the firing pin strikes the primer, the case moves forward to take up all of the available headspace. Depending on your rifle, the primer might actually ignite instantly on impact with the firing pin (before the case moves), while the case is moving, or when the shoulder bottoms out on the chamber and the case stops. The exact point of primer ignition might actually vary from shot-to-shot. With a lot of extra room for movement, this would be like firing a series of cartridges with varying overall lengths and varying amounts of bullet 'jump' from the case to the lands of the rifling; which results in reduced accuracy and less precise groups.
When fired, the case will stretch to take up all of the extra room in the chamber. More headspace means more stretching, and more stretching means more frequent trimming. Stretching also causes thinning of the case walls above the web (all that brass you're trimming off the case neck has to come from somewhere, right?). The more the case walls thin, the higher the likelihood of a case head separation. You will get fewer reloads out of your brass.
Rimmed and Belted Cases
The procedure described above for measuring the case head to shoulder distance and setting up the die accordingly
minimizes the extra headspace for rimless bottleneck rifle cartridges. This makes sense because non-belted
rimless cartridges headspace on the shoulder. But rimmed cartridges like the .30-30 or .303 British
headspace on the rim; and belted magnum cartridges like the 7mm Remington or .300 Winchester Magnum headspace
on the belt. Is there any benefit realized by setting up the die as described?
The answer is, "Yes". Setting back the shoulder only enough so that the cartridge will reliably chamber will minimize case stretch, and require less working of the brass during resizing. The less you work the brass, the less it will work hardens. Work-hardened brass is brittle and will split sooner than if it as not work-hardened. You will achieve longer brass life by following the procedures above when setting up the sizing die for rimmed and belted bottleneck cases.
Since belted and rimmed cases do not have to headspace on the shoulder, there's nothing keeping the rifle manufacturers from making the shoulder area of the chamber overly generous. This can result in an extreme amount of brass movement.
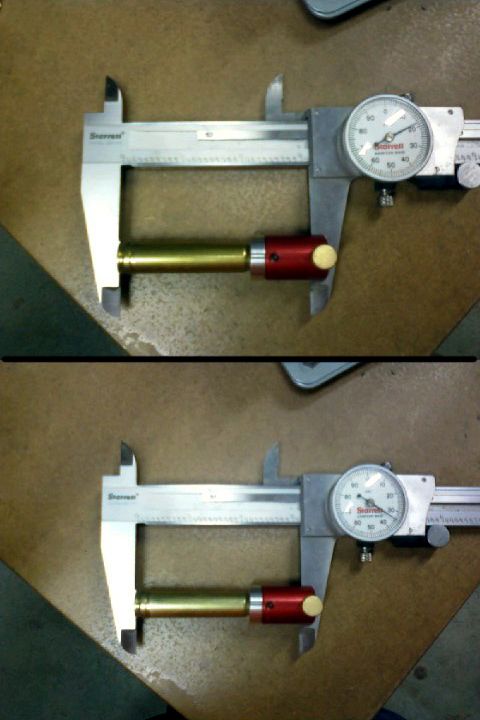
Figure 6 shows the case headspace length measurement of a factory 7mm Remington Magnum case (top) and the same case after firing (bottom). The case head-to-shoulder measurement increased by 0.016" during firing. If this case were resized according to the instructions that accompany the sizing die, the repeated shoving back and blowing out of the shoulder would cause the case to fail after just a few reloads. This is why belted magnums earned an undeserved reputation for short case life. Setting the shoulder back only enough to allow the case to reliably chamber will more than double the useful life of the brass.
Lever Guns and Rear Lug Bolt Action Rifles
Some lever-action rifles such as the Winchester 94 and Savage 99, and bolt action rifles like the Lee Enfield and
Schmidt Rubin 1889 feature rear locking lugs on the bolt. The longer distance between the chamber and the
locking lugs results in a 'springier" action than rifles with front locking lugs on the bolt. The
springier action sometimes allows the fired case to stretch beyond the chamber headspace dimension.
If you are loading for such a rifle, you might need to set the shoulder back a little more than the amounts
recommended above. Before sizing a large batch of cases, it is best to make up a dummy round (no powder
or primer) and test it in the rifle to ensure that it chambers freely. If not, you might need to set the
shoulder back a bit farther.
Loading for Multiple Rifles
The procedure described above allows you to tailor the cartridge headspace length for a particular rifle.
If you will be making ammo for multiple rifles, you will either have to measure a fired cartridge from each rifle
and set the case headspace length for the shortest chamber, or use an RCBS Precision Mic and set the case headspace
length at or near the SAAMI minimum. Either method will result in ammo that is safe to fire (very similar
to factory ammo), but you might not always achieve the best accuracy or longest possible case life.